Wifi Hotspot Recommendations
For portability, affordability, security, and customizability, I recommend
https://www.amazon.com/GL-iNet-GL-XE300-Industrial-Gateway-Extender/dp/B0CRCZWTLB/ref=sr_1_5?sr=8-5
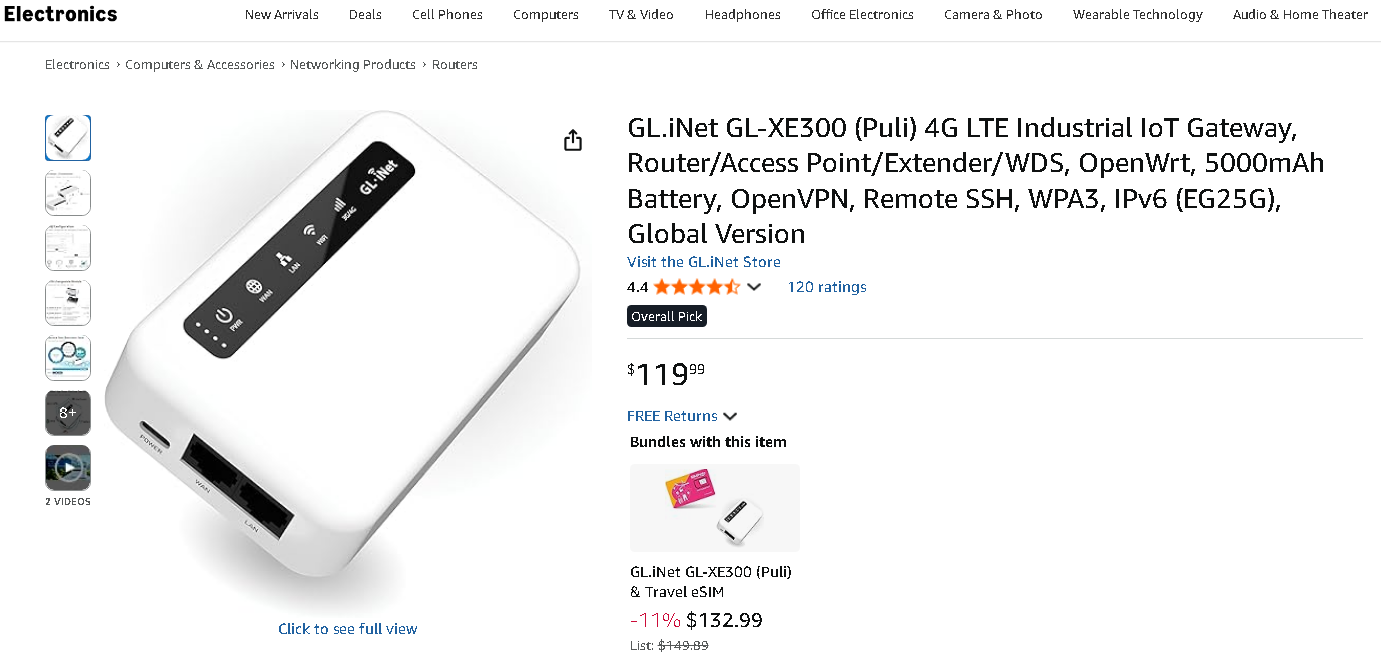
【SMART 4G TO WI-FI CONVERTER】Come with a standard nano-SIM card slot that can transfer 4G LTE signal to Wi-Fi networking. Up to 300Mbps (2.4GHz ONLY) Wi-Fi speeds. It can move into a 4G LTE wireless network if the Ethernet Internet fails, in order to ensure constant data transmission.
- 【OPEN SOURCE & PROGRAMMABLE】**OpenWrt pre-installed, unlocked, **extremely extendable in functions, perfect for DIY projects. 128MB RAM, 16MB NOR + 128MB NAND Flash. Dual Ethernet ports, USB 2.0 port, Antenna SMA mount holes reserved.
- 【SECURITY & PRIVACY】OpenVPN & WireGuard pre-installed, compatible with 30+ VPN service providers. With our brand-new Web UI, you can set up VPN servers and clients easily. IPv6, WPA3, and Cloudfare supported. Level up your online security.
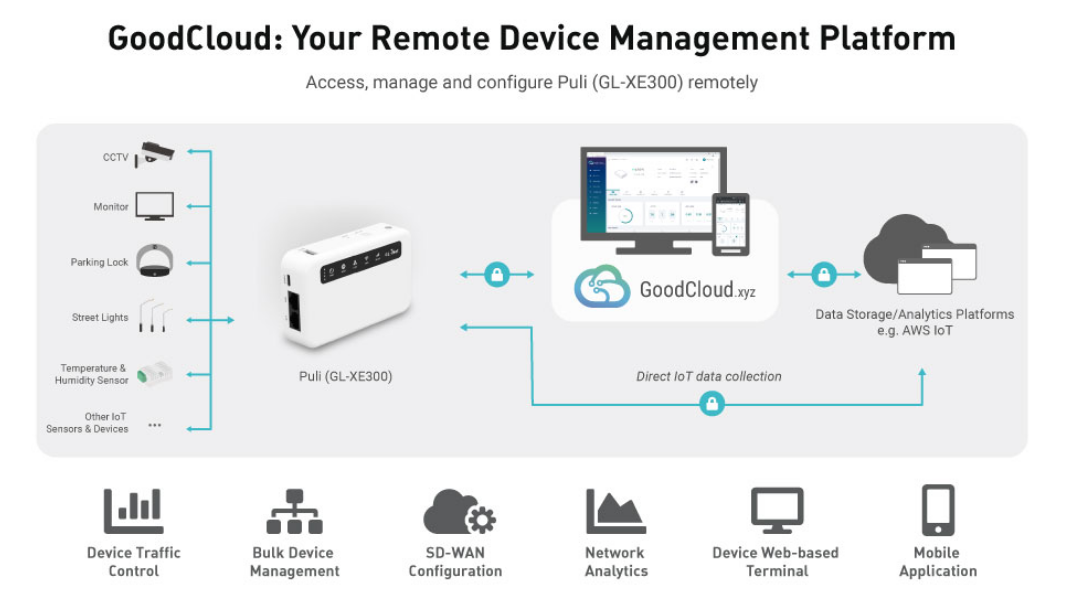
- 【Easy Configuration with Web UI and GoodCloud】GoodCloud allows you manage and monitor devices anytime, anywhere. You can view the real-time statistics,** set up a VPN server and client, manage the client connection list, and remote SSH to your IoT devices. The built-in 4G modem supports AT command, manual/automatic dial number, SMS checking, and signal strength checking in Web UI for better management and configuration.**
- 【PACKAGE CONTENTS】GL-XE300-EG25G 4G LTE Portable IoT Gateway (2-year Warranty) X1, Ethernet cable X1, 5V/2A power adapter (US, EU, UK Plugs) , User manual X1, Quectel EG25G 4G module pre-installed. Please refer to the online docs for first set up.
Puli (GL-XE300) 4G LTE Wireless Gateway
Puli (GL-XE300) is a portable 4G smart router that is perfect for home, business, and IoT solutions. With its OpenWrt-supported feature and large storage compatibility, it is designed for you to develop a DIY IoT project. It also comes with a rechargeable battery, so you can bring it anywhere with you!
Need To: Read and Create Docs about OpenWrt
cool clamp thing
https://www.adafruit.com/product/3791
Meh Don’t Sign up for This Cloud Thingy and You’ll Be Fine
can root this baby if we need to
Thinking about a Public LoRa Meshnet - Butter Spots / Resistance / Pigeon-net Hotspots at Major Gatherings
Over Time, Plant Solar-powered routers/repeaters throughout the Urban Landscape. These Strengthen Repeaters Ensure Coverage throughout the Planned Area
Routers
T-Beam SUPREME [US]
LILYGO® Shipping to USA only
https://lilygo.cc/products/t-beam-supreme-meshtastic-us0?variant=45414341705909
Nodes
Mestastic Pagers as an Example for Prototype a Mass Produced Version
https://lilygo.cc/products/t-lora-pager-meshtastic?variant=51863414177973
Discussion on reddit
https://www.reddit.com/r/meshtastic/comments/1mulxdc/lilygo_tlora_pager/?rdt=44154
he keyboard is pretty awful. The keys are quite stiff, requiring concentrated effort while typing. If you remember Blackberry devices - this is nothing like the Blackberry keyboard. It works, but is a mess. The T-deck keyboard is better. But, still nothing like as nice a keyboard as the Blackberry devices.
. ESP32 based.. that battery runtime will not be great.
https://github.com/meshtastic/firmware/pull/7613
Tiny Keyboard but Still Too $$ per Unit at $49 for the WiFi 2.4 Ghz, or even $30 for Wired Version
WiFi Version - Miniature Wireless USB Keyboard with Touchpad
https://www.adafruit.com/product/922
6” x 2.4” x 0.5” (152mm x 59mm x 12.5mm)

Wired Keyboard Microcontroller-friendly $29 Too much
https://www.adafruit.com/product/857
Smartwatches with LoRa Capabilities, Can Pre-flash for Important People
https://github.com/Xinyuan-LilyGO/T-Display-S3
Components that Can Be Mass-produced into LoRa walkie/meshenger for Low $ per Unit
https://raindrop.io/cyber-intelligence-brief/lo-ra-mesh-62821683
Travel Hotspot OpenWrt Config Tutorial
Setting Up an OpenWrt Router to Use Proton VPN (WireGuard)
Below is a practical, step‑by‑step guide you can follow on most OpenWrt‑compatible devices (e.g., TL‑WR1043ND, GL‑AR750, Raspberry Pi with OpenWrt, etc.). The instructions assume you have a basic OpenWrt installation already running and you can access the LuCI web UI (or SSH) as an administrator.
Tip: Keep a backup of your current configuration (System → Backup / Flash Firmware → Generate Archive) before you start, so you can roll back if anything goes wrong.
1️⃣ Gather the Proton VPN WireGuard Details
Log in to your Proton VPN account at https://account.protonvpn.com.
Go to “Downloads → WireGuard” (or “Manual configuration”).
Click “Add a new configuration”, select “WireGuard”, then choose a server location you’d like to connect to.
Proton VPN will generate a configuration file that looks like this:
[Interface]
PrivateKey = <YOUR_PRIVATE_KEY>
Address = 10.XX.YY.ZZ/32, fd00:xxxx:xxxx:xxxx::/128
DNS = 10.XX.YY.ZZ, 2606:4700:4700::1111
[Peer]
PublicKey = <SERVER_PUBLIC_KEY>
Endpoint = <SERVER_HOSTNAME>:51820
AllowedIPs = 0.0.0.0/0, ::/0
PersistentKeepalive = 25
Copy all the values (private key, address, DNS, server public key, endpoint, etc.) – you’ll paste them into OpenWrt later.
2️⃣ Install the WireGuard Packages on OpenWrt
You can do this via the LuCI UI or SSH.
Via LuCI (Web UI)
Navigate to System → Software.
Click “Update lists…” to refresh the package index.
In the “Filter” box type wireguard. Install the following packages (click Install for each):
wireguard-tools – command‑line utilities (wg, wg-quick).
kmod-wireguard – kernel module.
luci-app-wireguard – optional UI for managing tunnels.
luci-proto-wireguard – protocol support for network interfaces.
Via SSH
opkg update
opkg install wireguard-tools kmod-wireguard luci-app-wireguard luci-proto-wireguard
After installation, the kernel module loads automatically; you can verify with:
lsmod | grep wireguard
3️⃣ Create the WireGuard Interface
Using LuCI
Network → Interfaces → Add new interface…
Name: protonvpn-wg (any name you like).
Protocol: select WireGuard VPN.
Click Create Interface.
You’ll be taken to the WireGuard configuration page.
Using SSH (alternative)
uci set network.protonvpn_wg=interface
uci set network.protonvpn_wg.proto=‘wireguard’
uci commit network
/etc/init.d/network restart
4️⃣ Fill in the Proton VPN Parameters
In LuCI (recommended for readability)
Field Value (from Proton VPN config)
Private Key <YOUR_PRIVATE_KEY>
Listen Port leave blank (router will not accept inbound WG connections)
IP Addresses 10.xx.yy.zz/32 (add the IPv6 address too if you want IPv6, e.g., fdxx:xxxx:xxxx:xxxx::/128)
DNS servers 10.xx.yy.zz, 2606:4700:4700::1111 (or any DNS you trust)
Scroll down to Peers → Add and fill:
Peer field Value
Public Key <SERVER_PUBLIC_KEY>
Endpoint host <SERVER_HOSTNAME> (e.g., de-frankfurt.protonvpn.net)
Endpoint port 51820
Allowed IPs 0.0.0.0/0, ::/0
Persistent Keepalive 25 (seconds)
Click Save & Apply.
Using SSH (if you prefer CLI)
# Replace placeholders with your actual values
uci set network.protonvpn_wg.private_key=‘<YOUR_PRIVATE_KEY>’
uci add_list network.protonvpn_wg.addresses=‘10.xx.yy.zz/32’
# (optional IPv6)
# uci add_list network.protonvpn_wg.addresses=‘fdxx:xxxx:xxxx:xxxx::/128’
uci set network.protonvpn_wg.dns=‘10.xx.yy.zz 2606:4700:4700::1111’
# Peer configuration
uci add network protonvpn_wg_peer
uci set network.@protonvpn_wg_peer[-1].public_key=‘<SERVER_PUBLIC_KEY>’
uci set network.@protonvpn_wg_peer[-1].endpoint_host=‘<SERVER_HOSTNAME>’
uci set network.@protonvpn_wg_peer[-1].endpoint_port=‘51820’
uci set network.@protonvpn_wg_peer[-1].allowed_ips=‘0.0.0.0/0, ::/0’
uci set network.@protonvpn_wg_peer[-1].persistent_keepalive=‘25’
uci commit network
/etc/init.d/network restart
5️⃣ Route Your LAN Traffic Through the VPN
By default, OpenWrt will still route traffic via the WAN interface. You need to change the default route to go through the WireGuard tunnel.
Option A – Simple “All traffic through VPN”
Network → Interfaces → Edit the LAN interface.
Under Physical Settings, ensure “bridge interfaces” includes only eth0 (or whatever your LAN ports are). Do not add the WireGuard interface here.
Now go to Network → Firewall → Zones.
Find the ‘wan’ zone (or create a new zone called vpn).
Set Input/Output/Forward to ‘reject’ (or ‘accept’ if you need inbound).
Add the newly created protonvpn-wg interface to this zone.
Ensure ‘Masquerading’ is checked for the VPN zone.
In the Inter‑zone forwarding matrix, allow lan → vpn (and optionally vpn → lan if you want devices on the LAN to be reachable from the VPN).
Save & Apply.
Verify the default route:
ip route show table main
# You should see a default route via 10.xx.yy.zz dev wg0
Option B – Split‑tunnel (only selected devices or subnets)
If you want only certain devices to use the VPN:
Create a new firewall zone called vpn_clients.
Assign the protonvpn-wg interface to that zone.
In Network → Interfaces, edit the LAN interface and add a “Custom firewall rule” like:
iptables -t nat -A POSTROUTING -o wg0 -j MASQUERADE
iptables -A FORWARD -i br-lan -o wg0 -j ACCEPT
iptables -A FORWARD -i wg0 -o br-lan -m state —state ESTABLISHED,RELATED -j ACCEPT
Then, on the client devices you wish to route through the VPN, set a static route pointing the default gateway to the router’s LAN IP (the router will forward it via the VPN zone).
6️⃣ Test the Connection
Check WireGuard status (LuCI → Services → WireGuard, or via SSH):
wg show
You should see something like:
interface: wg0
public key: <SERVER_PUBLIC_KEY>
endpoint: <SERVER_HOSTNAME>:51820
allowed ips: 0.0.0.0/0, ::/0
latest handshake:
transfer:
Verify your public IP:
From a device behind the router, browse to https://ipleak.net or run:
The displayed IP should belong to the Proton VPN server you selected.
DNS leak test (also on ipleak.net) – the resolver should be the DNS you configured (Proton’s DNS or the one you entered).
7️⃣ Optional Enhancements
Feature Why it helps How to enable
Kill switch Guarantees no traffic leaks if the VPN drops. In the firewall zone for vpn, set ‘Reject’ for any forward from lan to wan. Or add a rule: iptables -I FORWARD -i br-lan ! -o wg0 -j REJECT
Automatic reconnection WireGuard will try to reconnect, but you can force a restart on failure. Add a cron job: */5 * * * * /etc/init.d/network restart (or use watchdog scripts).
IPv6 support Some services require IPv6. Ensure the AllowedIPs line includes ::/0 and that the DNS line contains an IPv6 DNS server (e.g., 2606:4700:4700::1111).
Multiple VPN servers Load‑balance or fail‑over. Create additional WireGuard interfaces (e.g., protonvpn-wg-us, protonvpn-wg-nl) and use policy‑routing (ip rule + ip route) to select based on destination or source.
8️⃣ Troubleshooting Checklist
Symptom Likely cause Quick fix
No IP change WireGuard not establishing handshake. Run wg show; check latest handshake. Verify endpoint hostname resolves, port 51820 is reachable (nc -vz
DNS leaks DNS servers not overridden. Ensure the dns field is set on the WireGuard interface, and that the firewall zone has ‘Masquerading’ enabled.
Partial connectivity (some sites work, others don’t) MTU mismatch (LoRa/PPP). Set a lower MTU on the WG interface: uci set network.protonvpn_wg.mtu=‘1380’ (or 1420).
Frequent disconnects ISP blocks UDP 51820. Switch to a different Proton server that supports TCP fallback (Proton offers a “TCP” endpoint for WireGuard).
Clients can’t reach the internet Missing NAT rule. Verify iptables -t nat -L POSTROUTING includes MASQUERADE for wg0.
TL;DR – One‑liner Command Summary (SSH)
# 1️⃣ Install packages
opkg update && opkg install wireguard-tools kmod-wireguard luci-app-wireguard luci-proto-wireguard
# 2️⃣ Create WG interface
uci set network.protonvpn_wg=interface
uci set network.protonvpn_wg.proto=‘wireguard’
uci set network.protonvpn_wg.private_key=‘<YOUR_PRIVATE_KEY>’
uci add_list network.protonvpn_wg.addresses=‘10.xx.yy.zz/32’
uci set network.protonvpn_wg.dns=‘10.xx.yy.zz 2606:4700:4700::1111’
# 3️⃣ Add peer
uci add network protonvpn_wg_peer
uci set network.@protonvpn_wg_peer[-1].public_key=‘<SERVER_PUBLIC_KEY>’
uci set network.@protonvpn_wg_peer[-1].endpoint_host=‘<SERVER_HOSTNAME>’
uci set network.@protonvpn_wg_peer[-1].endpoint_port=‘51820’
uci set network.@protonvpn_wg_peer[-1].allowed_ips=‘0.0.0.0/0, ::/0’
uci set network.@protonvpn_wg_peer[-1].persistent_keepalive=‘25’
# 4️⃣ Firewall (simple all‑traffic‑through‑VPN)
uci add firewall zone
uci set firewall.@zone[-1].name=‘vpn’
uci set firewall.@zone[-1].input=‘REJECT’
uci set firewall.@zone[-1].output=‘ACCEPT’
uci set firewall.@zone[-1].forward=‘REJECT’
uci set firewall.@zone[-1].masq=‘1’
uci add_list firewall.@zone[-1].network=‘protonvpn_wg’
uci commit firewall
# 5️⃣ Allow LAN → VPN forwarding
uci add firewall forwarding
uci set firewall.@forwarding[-1].src=‘lan’
uci set firewall.@forwarding[-1].dest=‘vpn’
uci commit firewall
# 6️⃣ Restart
/etc/init.d/network restart && /etc/init.d/firewall restart
Replace the placeholder values with those from your Proton VPN WireGuard profile
SEWABLE NFC BUTTONSSSSS
https://www.adafruit.com/product/4429

NFC BRACELETS YALL
https://www.adafruit.com/product/4043

This is a blank **13.56MHz RFID/NFC Bracelet with an NTAG213 **chip - often used for train/bus passes, information sharing, contactless payment, but also found in other systems where a proximity card is desired. The bracelet contains a small RFID chip and an antenna, and is passively powered by the reader/writer when placed a couple inches away.
These can be read by almost any 13.56MHz RFID/NFC reader, but make sure it can handle ISO/IEC 14443 Type A cards (the standard NTAG uses) as there are a few other encoding standards (like FeLica).
These chips can be written to and store up to 144 bytes of data in writable EEPROM divided into 4 byte banks, and can handle over 10,000 re-writes. You can use our PN532 NFC/RFID breakout board or Adafruit NFC/RFID Shield for Arduino to read and write data to the EEPROM inside the tag. There is also a permanent 7-byte serial number ID burned into the chip that you can use to identify one tag from another - the ID number cannot be changed.
These use an NTAG chipset, a ‘Type 2’ tag that is usable with any smartphone. Unlike “Classic 1K” cards (a.k.a MiFare S50s), these** tags are more secure and work with almost any phone w**ith RFID support since they avoid the patent issues with Mifare, which requires an NXP chipset or license fee.
BRO ITS 4 BUCKS
https://www.adafruit.com/product/4701
“This RFID tag is really unique: it works with mobile phones just like other RFID tags, but you can reprogram it over I2C. The tag shows up as an ISO/IEC 15693 (13.56MHz) chip which is readable by phones and tablets. This could be interesting in situations where you want a tag that can be re-written dynamically when connected to a controller. For example, we did a test where we had a microcontroller write different URLs a few seconds apart, and the mobile phone detected the different URLs one after the other.
Note that the most popular hobby RFID reader/writer chips like the PN532 do not support ISO15693 so you cannot use those to read the ST25DV tag once programmed! We used both Apple and Android phones with success to read the tags.
According to the datasheet, one can even use it as an ‘I2C to RFID’ transfer system to wirelessly send and receive data from mobile devices (you’ll need to write a custom app for that kind of project, though).”
Loading up a Drive for a Democracy Hotspot how to
https://learn.adafruit.com/digital-free-library/transferring-files